
5 Best Editing Techniques for Outdoor Photography Success
When it comes to outdoor photography, achieving that perfect shot often requires more than just a great camera and a stunning landscape. You need to master the art of editing to truly bring out the best in your outdoor photos. But where do you start?
The key lies in five essential editing techniques that can elevate your outdoor photography to the next level. These techniques will not only enhance the visual appeal of your images but also allow you to capture the true essence of the natural beauty that surrounds you.
So, how exactly can you achieve outdoor photography success through editing?
Color Correction
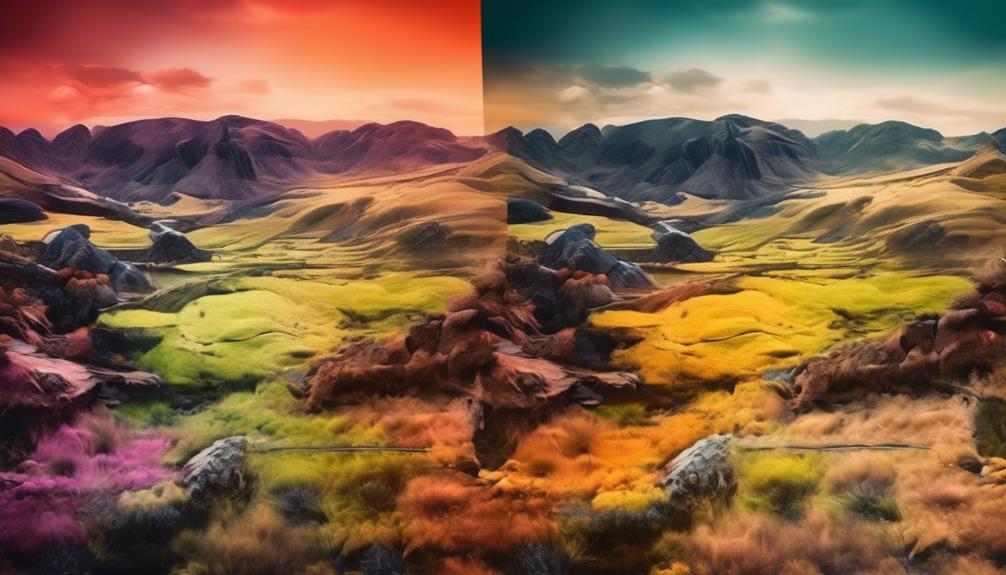
Color correction is an essential step in outdoor photography editing. It allows you to adjust and enhance the colors in your images for a more captivating result. Saturation adjustment is one way to manipulate colors. You can make them more vibrant and intense or tone them down for a more muted effect. This control over color intensity significantly impacts the overall mood and visual appeal of your outdoor photos.
Balancing the light in your images is crucial for achieving natural and true-to-life colors. By adjusting the light balance, you can ensure that the colors in your photos appear as they did in the actual outdoor setting. This helps to avoid any unwanted color casts or tints.
Another powerful tool for color correction in outdoor photography is the use of gradient filters. These filters allow you to selectively adjust the exposure and color balance in specific areas of your image. For example, you can darken an overexposed sky or add warmth to a cool-toned landscape. By strategically applying gradient filters, you can bring out the full range of colors and tones in your outdoor photos, creating a more balanced and visually striking composition.
Incorporating vibrance adjustment in your editing process can help you enhance the overall richness and depth of the colors in your outdoor images. This technique avoids over-saturation and results in a more natural and appealing look.
These techniques, when used effectively, can elevate the impact of your outdoor photography through precise and artful color correction.
Exposure Adjustment
To enhance the quality of your outdoor photographs, consider adjusting the exposure to achieve optimal lighting and depth in your images. Exposure adjustment is crucial in outdoor photography as it helps in balancing the light and dark areas of your photo, ensuring that the details are well-defined and the colors are accurately represented.
When adjusting the exposure, it's important to understand light metering and dynamic range.
Light metering is the process of measuring the amount of light in a scene to determine the optimal exposure settings. There are different light metering modes such as spot metering, center-weighted metering, and evaluative metering. Spot metering measures the light in a specific area of the frame, while center-weighted metering gives more importance to the center of the frame. Evaluative metering takes into account the entire frame to calculate the exposure. Understanding these modes and when to use them can greatly impact the overall exposure of your outdoor photographs.
Dynamic range refers to the range of light intensities from the darkest to the brightest areas in a scene that a camera can capture. When adjusting exposure, it's essential to consider the dynamic range to ensure that details are preserved in both the shadows and highlights. By carefully adjusting the exposure, you can expand the dynamic range of your photographs, resulting in images with balanced exposure and rich details.
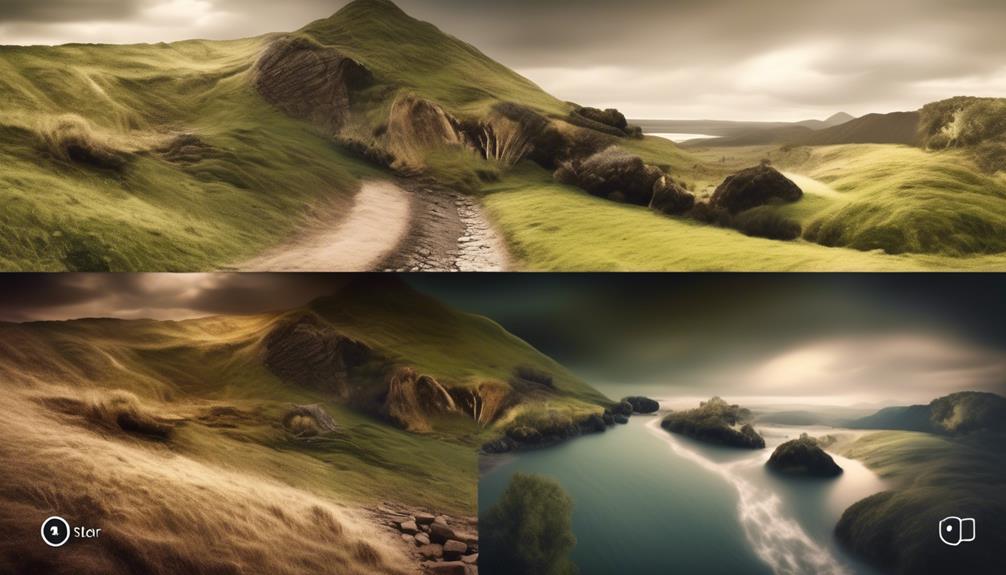
Contrast Enhancement
Enhancing the contrast in your outdoor photographs can further elevate the visual impact by emphasizing the dynamic range achieved through exposure adjustment. By adjusting the contrast, you can make the dark areas of the image darker and the light areas lighter, creating a more visually striking and dynamic photo.
One effective way to enhance contrast is by using lighting effects to bring out the depth and texture in your outdoor scenes. By strategically manipulating the light and shadows, you can create a more dramatic and captivating image.
Another powerful technique for contrast enhancement is luminosity masking. This method allows you to target specific tonal ranges in your photo and apply contrast adjustments only to those areas. For example, you can use luminosity masking to enhance the contrast in the sky without affecting the contrast in the foreground, resulting in a more balanced and visually appealing photograph.
When applying contrast enhancement techniques, it's important to strike a balance and avoid over-editing, which can lead to unnatural-looking photos. Subtlety is key, and small adjustments can often make a big difference. Additionally, consider the mood and atmosphere you want to convey in your outdoor photographs, as different levels of contrast can evoke different emotions in the viewer.
Incorporating these contrast enhancement techniques into your outdoor photography editing workflow can help you create more impactful and visually stunning images that truly capture the beauty of the natural world.
Sharpening and Noise Reduction
For achieving optimal image quality in your outdoor photographs, sharpening and noise reduction play a crucial role in enhancing the overall clarity and reducing unwanted visual distractions.
Here are a few key techniques for sharpening and noise reduction to help you achieve the best results:
- Sharpening: This technique enhances image clarity by increasing the contrast along the edges in your photos, resulting in a crisper and more defined look. It brings out intricate details in elements such as landscapes, wildlife, and textures, making your outdoor images more compelling and vibrant.
- Noise Reduction: By minimizing digital artifacts such as grain or speckles, noise reduction ensures a smoother and cleaner appearance in your photos. This is particularly beneficial in outdoor photography, where factors like high ISO settings or low light conditions can introduce unwanted noise. Implementing noise reduction effectively maintains the integrity of your images, especially in areas with uniform tones like skies or water bodies.
- Selective Sharpening: Applying sharpening selectively to specific areas of your outdoor photos allows you to control which elements stand out, such as emphasizing fine details in the main subject while keeping the background or less important elements subtly blurred. This technique directs the viewer's attention to the focal point of the image, creating a more impactful visual narrative.
- Balancing Sharpening and Noise Reduction: Achieving the ideal balance between sharpening and noise reduction is essential for maintaining image clarity while minimizing digital artifacts. This equilibrium ensures that your outdoor photographs appear sharp and vibrant while preserving a natural and authentic visual representation of the scene.
Implementing these sharpening and noise reduction techniques will elevate the quality of your outdoor photography, resulting in visually stunning and captivating images.
White Balance Adjustment
Optimizing the white balance adjustment in your outdoor photography is essential for ensuring accurate color representation and maintaining the visual integrity of your images, complementing the sharpening and noise reduction techniques discussed earlier.
When photographing outdoors, natural lighting conditions can vary significantly, impacting the overall color temperature of your images. Adjusting the white balance allows you to neutralize any color casts caused by the different qualities of light, ensuring that the whites appear truly white and that the colors are rendered accurately.
To achieve optimal white balance in your outdoor photography, consider using custom presets based on the specific lighting conditions you encounter. Custom presets allow you to fine-tune the white balance settings to match the particular lighting scenario, whether it's the warm glow of a sunset, the cool tones of a cloudy day, or the neutral light on a clear, sunny morning. By creating and utilizing custom presets, you can consistently achieve accurate color representation across your outdoor images, enhancing their overall visual impact.
Furthermore, being mindful of the natural lighting and making necessary white balance adjustments during the photo shoot can save you editing time later. By capturing images with the correct white balance settings, you can minimize the need for extensive post-processing adjustments, resulting in more efficient and effective outdoor photography workflow.
Cropping and Straightening
When cropping and straightening your outdoor photography, ensure that the composition effectively highlights your subject and eliminates any distracting elements from the frame. Here are some tips to help you master this crucial editing technique:
- Composition tips: Before cropping, analyze the image to identify the most compelling elements. Consider the rule of thirds or the golden ratio to guide your cropping decisions. This can help create a balanced and visually pleasing composition.
- Framing techniques: Use cropping to enhance the framing of your subject within the image. By adjusting the crop, you can draw more attention to the subject and create a stronger visual impact.
- Aspect ratio: Experiment with different aspect ratios to see which best suits the composition. A square crop can add symmetry, while a panoramic crop can emphasize the vastness of a landscape.
- Perspective adjustment: Straightening the horizon or vertical lines within the image can make a significant difference. It helps to maintain a sense of balance and realism in the final photograph.
Selective Editing
After ensuring that your composition effectively highlights your subject and eliminates any distracting elements, you can now focus on mastering the technique of selective editing in outdoor photography. Selective editing involves manipulating light, retouching images, removing objects, and adjusting the background to enhance the overall impact of your outdoor photos.
One important aspect of selective editing is light manipulation. You can selectively adjust the exposure, contrast, and highlights to draw attention to specific areas of your outdoor photograph. By doing so, you can bring out the details in both the subject and the surrounding environment, creating a more visually compelling image.
Image retouching is another key component of selective editing. This involves refining and enhancing specific elements within your outdoor photograph. Whether it's fine-tuning the colors of a landscape or enhancing the details of a portrait, image retouching allows you to selectively improve the overall quality of your outdoor photography.
Furthermore, selective editing enables you to remove unwanted objects from your outdoor photos. Whether it's a stray branch or an unsightly trash can, object removal helps ensure that your subject remains the focal point of the image.
Lastly, background adjustment plays a crucial role in selective editing. You can selectively blur or sharpen the background to create a more visually appealing composition, drawing the viewer's attention to the main subject of your outdoor photograph.
Mastering the art of selective editing will elevate the quality of your outdoor photography, allowing you to create impactful and visually stunning images.
Adding Creative Filters
To enhance the visual impact of your outdoor photographs, consider incorporating creative filters during the editing process. Creative filters can add depth and drama to your images, elevating them from ordinary to extraordinary.
Here are four ways creative filters can enhance your outdoor photography:
- Enhancing Creative Composition: Creative filters can be used to emphasize the composition of your outdoor photographs. By adding a vignette filter, you can draw the viewer's eye towards the main subject, creating a more dynamic and engaging composition.
- Amplifying Natural Lighting Techniques: Filters such as polarizers or graduated neutral density filters can enhance the natural lighting in your outdoor photographs. These filters can help to reduce glare, deepen the colors of the sky, and balance the exposure between the sky and the landscape, resulting in stunning and well-balanced outdoor images.
- Creating Artistic Effects: Creative filters offer a wide range of artistic effects that can transform your outdoor photographs. From adding a dreamy soft focus to creating a vintage look, filters allow you to infuse your images with unique and artistic qualities.
- Bringing Out Textures and Details: Filters like the clarity or texture filter can be used to bring out the textures and details in outdoor photography. Whether it's the rugged texture of a mountain or the delicate details of a flower, these filters can add depth and dimension to your outdoor images.
Frequently Asked Questions
How Can I Make the Colors in My Outdoor Photos Pop Without Using Color Correction?
To make the colors in your outdoor photos pop without using color correction, try saturation techniques to enhance vibrancy. Also, consider composition tips like using leading lines or framing to create visual interest and draw attention to the vibrant colors.
Are There Any Exposure Adjustment Techniques Specifically Tailored for Shooting in Harsh Sunlight?
When shooting in harsh sunlight, adjust your white balance to correct color temperature. Use spot metering to expose for highlights and avoid overexposure. These techniques will help you capture balanced and well-exposed outdoor photos.
What Are Some Advanced Contrast Enhancement Methods for Capturing Landscapes With Varied Lighting Conditions?
To enhance contrast in outdoor landscapes with varied lighting, try advanced lighting techniques. Experiment with contrast manipulation to bring out the details in your photos. With outdoor photography, mastering these methods can truly elevate your work.
Is There a Specific Sharpening Technique That Works Best for Wildlife Photography in Outdoor Settings?
When editing wildlife compositions in outdoor settings, use sharpening methods to enhance details. Adjusting contrast and clarity can also bring out textures and make your subjects stand out. Experiment with different settings to find what works best for each image.
How Can I Reduce Noise in My Outdoor Photos Without Sacrificing Too Much Detail?
To reduce noise in outdoor photos without sacrificing too much detail, adjust the noise reduction settings in your editing software. Consider using outdoor photo lighting to soften the effect. This can help preserve the natural detail while minimizing noise.
Conclusion
Now that you've learned these 5 best editing techniques for outdoor photography, you can take your photos to the next level.
With color correction, exposure adjustment, contrast enhancement, sharpening and noise reduction, white balance adjustment, cropping and straightening, selective editing, and adding creative filters, your outdoor photos will be stunning.
Keep practicing and experimenting with these techniques to see the best results in your outdoor photography.
Happy editing!